
Book Cover File Prep
For Softcover, Hardcover, and Dust Jacket Files
Unlike preparing your Interior Page PDF file that keeps each page separate, your Book Cover file needs to combine the 3 parts of your book cover all together into one spread: the front cover + the spine + the back cover. However, preparing the files is a little different for softcover, hardcover and dust jacket files.
Softcover Book Cover: Your PDF File Checklist
- The first question to ask yourself: Does my file match my printing quote? Last minute changes are common, and so it’s important to check back and make sure that your page count, paper choice and binding style remains the same. This is also when you should do a final and thorough proofreading of your manuscript for any spelling or grammatical errors, or have someone do it for you. Most desktop publishing software (MS Word, Adobe InDesign, etc) has a convenient spellcheck tool.
- Size of Cover Page: In the case of a softcover book, the cover trims flush with the book’s block of pages. Therefore, the front and back covers are built to the same size as your interior pages. If you chose a 5.5″ x 8.5″ trim size for your book, then your front and back cover will be 5.5″ x 8.5″ plus bleed.
- Bleed: You would need to add .125″ bleed to the basic cover size if any of your cover graphics — whether they are just a flat color or an actual image — go beyond the edge of the book’s trim size. Click on the diagram to enlarge it. Your pdf must also include the bleed area, so please ensure that you save your pdf to include bleeds.
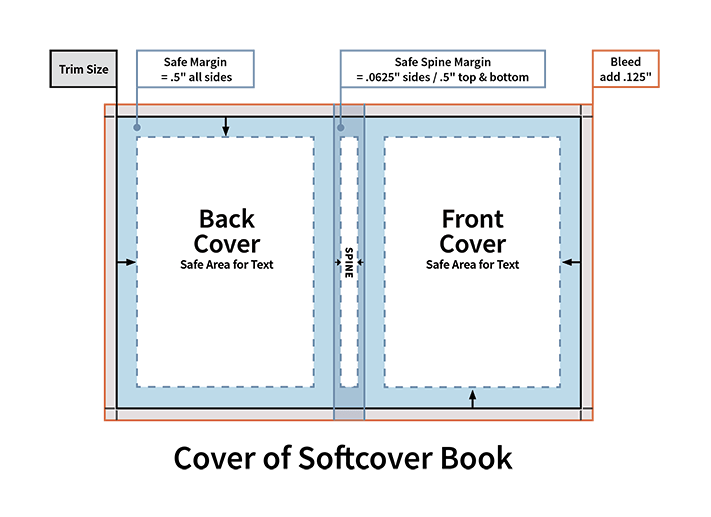
- Spine: To determine the width of the spine, use our Spine Calculator to add the proper width of your spine to your cover spread. The Spine Calculator combines the number of pages in your book, the paper stock you chose, and the binding style to calculate the correct dimensions of your spine. If you change any of these factors, please recalculate the width of your book’s spine.
- Margins: This no-print zone is consistent all around your cover spread. The spine, however has a smaller spine margin of .0625″ on each side (1/16″). The spine margin represents a safety net so that your text does not get too near the edge or roll over onto one of the adjoining covers. Text that’s placed in the printable area of the spine should be centered horizontally along the width of the spine. Because of this, books with a spine width of less than .25″ do not generally have any text on their spines.
- Margin Recommendation: We recommend a minimum of a .5″ margin (1/2″) around all the outside edges of your Book Cover spread, and a minimum of .0625″ margin for each side of your spine.
File Size Example for a 5.5″ x 8.5″ Softcover Book Cover File Width: .125″ Bleed + 5.5″ Back Cover + (Calculated Spine Width) + 5.5″ Front Cover + .125″ Bleed Height: .125″ Bleed + 8.5″ Back Cover + .125″ Bleed
- Graphic Files: All images should be 300 dpi (dots per inch) for optimal reproduction. Below this, and your images are likely to look grainy, pixelated and blurry.
- Color and Black and White: The document should be saved in CMYK. Any color images should be saved in CMYK. Black and white images should be saved in grayscale mode.
- ISBN Barcode: This should be added to the back cover if you are planning to sell your book at retail. Retailers need to be able to easily scan your barcode.
- Type Fonts: All fonts must be embedded.
If you need a paper type or page quantity not shown, contact us and we’ll help you get the correct dimensions for your spine.
Hardcover Book Cover: Your PDF File Checklist
- After ensuring your files match your printing quote, do a final and thorough proofreading of your manuscript for any spelling or grammatical errors, or have someone do it for you. Most desktop publishing software (MS Word, Adobe InDesign, etc) has a convenient spellcheck tool.
- Size of Cover Page: For hardcover books, the cover is sized a little differently than the book’s block of pages. The covers overhang the pages slightly, and have to account for the binding. When determining the height of your cover file, start with the trim size you’ve chosen for your book, then add .25″. For the width of your cover file, subtract .125″. With a hardcover book, you also need to account for the “Crimping Area” which is the area on each side of the spine where the cover’s hinge will be. Crimping requires you add .437″ to both front and back cover. If you change any of these factors, please recalculate the width of your book’s spine.
- The Bleed Margin (The Wrap-Around Area): Add an additional .4″ beyond the outside edge of your cover file. Why? The covers of hardcover books need extra paper that gets wrapped around the stiff millboard covers, and then glued onto the inside covers where it’s covered with endpapers for a nice finished look. This wrap-around area also functions as a bleed for your page, so any graphics that extend up to or past the edge of your cover— flat color, photos, etc — must extend across the entire wrap-around area. Clicking on the diagram enlarges it. Note: The bleed is in addition to the size you have determined for your cover. However, please ensure that the pdf you submit includes the bleed area, and does not include crop marks.
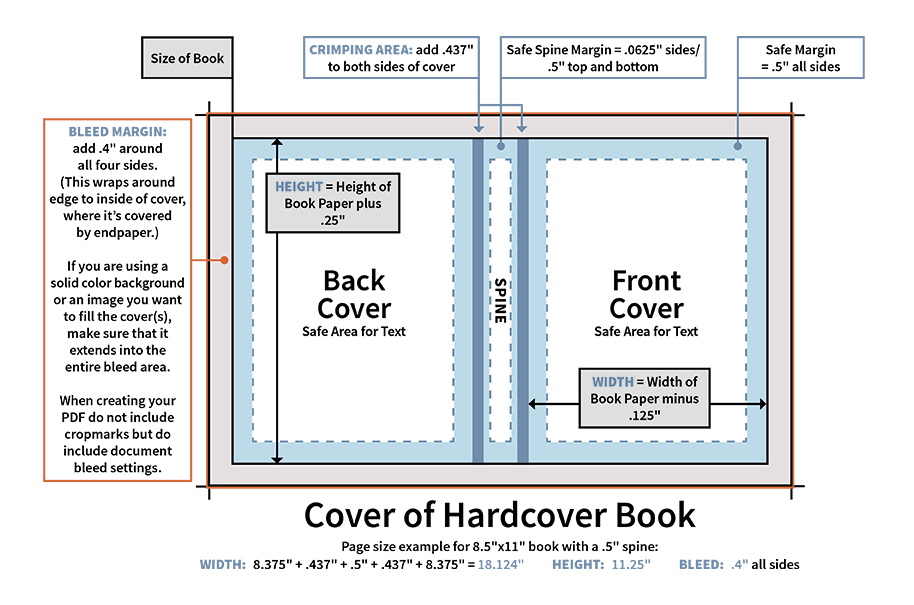
- Margins: Maintaining a “safe” no-print zone all around the edges of your cover spread keeps text safely away from the edge of the cover. Covers are also more aesthetic when text is not too close to the edge of the book, so we recommend a minimum of a .5″ margin (1/2″) around all the outside edges. You can choose to have a larger safe margin if you prefer.
- Spine: To determine the width of the spine, use our Spine Calculator to add the proper width of your spine to your cover spread. The Spine Calculator combines the number of pages in your book, the paper stock you chose, and the binding style to calculate the correct width of your spine.
- The Spine Margin: The spine usually has limited printable space, but it also needs a “safe” margin so that your text does not get too near the edge or roll over onto one of the adjoining covers. Keep text .0625″ (1/16″) away from the right and left side of the spine. Text that’s placed in the printable area of the spine should be centered horizontally along the width of the spine. Books with a spine width of less than .25″ do not generally have any text on their spines. File Size Example for a 5.5″ x 8.5″ Hardcover Book Cover File Width: .4″ Bleed Margin + 5.5″ Back Cover minus .125″ + .437″ Crimping Area + (Calculated Spine Width) + .437″ Crimping Area + 5.5″ Front Cover minus .125″ + .4″ Bleed Margin Height: .4″ Bleed Margin + 8.5″ Back Cover plus .25″ + .4″ Bleed Margin
- Graphic Files: All images should be 300 dpi (dots per inch) for optimal reproduction. Below this, and your images are likely to look grainy, pixelated and blurry.
- Color and Black and White: The document should be saved in CMYK. Any color images should be saved in CMYK. Black and white images should be saved in grayscale mode.
- ISBN Barcode: This should be added to the back cover if you are planning to sell your book at retail. Retailers need to be able to easily scan your barcode.
- Type Fonts: All fonts must be embedded in your pdf.
Dust Jacket Cover File: Your PDF File Checklist
Dust Jackets are a popular addition to cloth or leatherette-covered hardcover books. They can protect the book, and can enhance the presentation of the book with eye-catching cover art. Some customers also choose to use them because – with their fold-over flaps – they offer more room to add information — tantalizing book details, author bio, quotes and reviews, etc.
Our most popular choice for dust jackets is a sturdy 80# cover stock with a protective matte or glossy laminated finish. There is a long history of designers getting creative with the possibilities a dust jacket offers: metallic foil, diecuts, a soft-touch coating or in some cases, using a dust jacket to intentionally hide another surprising cover that lies beneath.
- Proofreading: We recommend that you start by proofreading your dust jacket for any spelling or grammatical errors, or have someone do it for you. Most desktop publishing software (MS Word, Adobe InDesign, etc) has a convenient spellcheck tool.
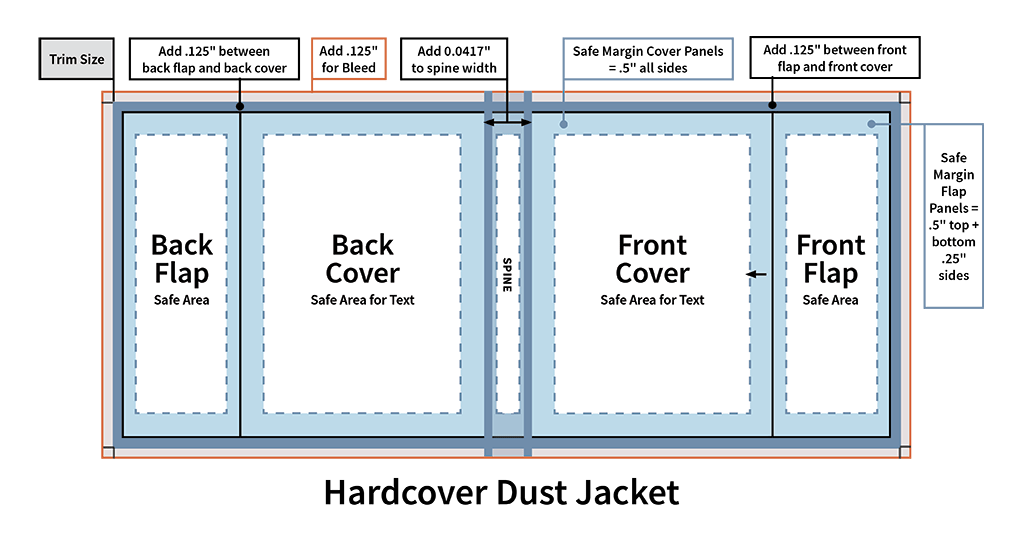
- Size of Panels: A dust jacket is comprised of 5 panels: the Back Flap, Back Cover, Spine, Front Cover and the Front Flap. In order for the paper dust jacket to be able to wrap around the spine and book cover when it opens and closes, the dust jacket needs to add a little to the dimensions of your book’s trim size. Start with the trim size you chose for your hardcover book. For the Front and Back Flaps, add 3″ to the outside edge of both front and back covers to create the flaps. Add 0.125″ between back flap and back cover as well as front cover and front flap. Then add a 0.125″ bleed beyond that. These measurements remain the same, regardless of your chosen book size.
- Margins: This no-print zone is a consistent .5″ across the top of all your panels. The Front and Back Covers also have a safe margin of .5″ on each side. The spine, gets a smaller left and right margin of .118″. Text that’s placed in the printable area of the spine should be centered horizontally along the width of the spine. The Back and Front Flaps have left and right safe margins of .25″. These are our recommendations for minimum margins on each panel. You can choose to make your safe margins larger if you prefer.
File Size Example for a 5.5″ x 8.5″ Hardcover Book’s Dust Jacket File
Width (From left to right): .125″ Bleed + 3″ Back Flap + .125″ (addition between flap and cover) + 5.5″ Back Cover + (Calculated Spine Width) + 5.5″ Front Cover + .125″ (addition between cover and flap) + 3″ Back Flap + .125″ Bleed
Height: .125″ Bleed + 8.5″ (Height of Hardcover Cover) + .125″ Bleed
- Graphic Files: All images should be 300 dpi (dots per inch) for optimal reproduction. Below this, and your images are likely to look grainy, pixelated and blurry.
- Color and Black and White: The document should be saved in CMYK. Any color images should be saved in CMYK. Black and white images should be saved in grayscale mode.
- ISBN Barcode: This should be added to the dust jacket’s back cover if you are planning to sell your book at retail. Retailers need to be able to easily scan your barcode.
- Type Fonts: All fonts must be embedded in your pdf.